A 403 forbidden error is an error code that is often displayed on websites. If you get an error code this is of course very frustrating. At first glance, the 403 forbidden error code seems like a serious error code because your website or page is simply not visible. Still, this error code is relatively easy to fix. How? You can read it in this article.
403 forbidden: what does it mean?
Let’s start at the beginning and see what the 403 error code means. The 403 error code is an HTTP status code that your web browser receives after contacting the web server. Normally, if your website is working properly, the webpage will have a status code of 200. So your website will not work properly if you see the 403 forbidden message. The 403 forbidden error falls into the category ‘4xx – Client Error’, which also includes the more well-known 404 error, for example. All 4xx HTTP error codes are responses from your web server informing the client that the request could not be processed successfully. So the reason you get the 403 message is because your server knows what to do, but can’t perform it for unknown reasons.
403 forbidden causes
There can be several causes of the 403 forbidden error. The most common causes are:
- A missing index.html or index.php file
- Wrong permissions on files or folders
- An error in the .htaccess or Nginx configuration
- Plugins that are corrupt or incompatible
Thus, depending on your web host, CMS and settings you’ve set yourself, there are therefore several causes of the 403 message. In some cases, a 403 forbidden message is a conscious choice. This is the case, for example, if you or the administrator of a website do not want to display certain images publicly. If your website does not have an index.html or an index.php file, your server will search for these files, in vain.
It is also possible that the file has been named incorrectly: as these file names are case sensitive. So be careful about this. Another possible cause of, for example, the ‘403 forbidden access is denied’ message are incorrectly set permissions on a folder or file.
In case you didn’t know yet: every folder and file on the server has its own file permissions. This indicates whether others are allowed to read, write or output this data. The permissions are shown as three numbers:
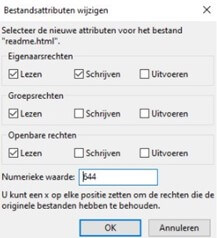
Through a program such as Filezilla you can access the files on the web server and view the file permissions by right-clicking on a file or folder and then clicking on “file permissions” at the bottom. The screen you see above will open. Here you can change the permissions of the file. If you click on or off, you will see that the three digits change automatically.
Another cause of the 403 error message is a corrupt or erroneous .htaccess. This is only possible if your web host runs on Apache, for example. If your web host is running Nginx you will not have a .htaccess file, then Nginx configurations will be used. An .htaccess file is a directory-level configuration file that contains certain instructions. These instructions specify how the incoming traffic to your website is handled. Because this file can contain a lot of code/text, things often go wrong here. Wrong settings or lines of ‘code’ then override the 403 forbidden error message.
In exceptional cases, malfunctioning plugins/extensions may cause the 403 error. This is a common cause of this problem, especially with WordPress websites that are often crammed with plugins.
403 forbidden solutions
A missing index.html or index.php file
The solution is actually simple: create an index.html or index.php file (make sure it does not contain capital letters) and put it in the mapdomains/domein.nl/public_html via the file manager at your web host or for example via Filezilla. If you have an existing index file, make a backup of it just to be sure. Should something go wrong with changing, deleting or adding your index.html/index.php file, you always have a backup.
Wrong permissions on files or folders
In most cases the file permissions are right, but if you get a 403 forbidden error, it makes sense to look at this because this error code often has something to do with the file permissions. As described earlier in this article, you can change the file permissions via the folder structure with a program such as Filezilla. According to the WordPress Codex, these are the best file permissions for WordPress:
- Files: 644 or 640
- Folders: 755 or 750
For Magento these are:
- Files: 660 or 644
- Folders: 770 or 755
If you have any doubts about this, please contact your web host to be sure. You should avoid setting the permissions too flexibly. This makes it easier for hackers or other malicious parties to hack into your website.
An error in the .htaccess
.htaccess files are often full of lines of text in which an error is easily made. If this is the case you may get a 403 forbidden error code. You can test if your .htaccess file is corrupt by deleting it via Filezilla. Please note that you first make a backup of this file so that you can always restore it. If you have removed the .htaccess file, you can generate a new .htaccess file in WordPress, for example, by going to Permalinks in the Settings, and saving this page again. Once you’ve done this, WordPress will automatically create a new .htaccess file for you. You can now check whether the notification is gone. You can create your own .htaccess file for Magento. A template for this can be found on Github. Please note: if your website or webshop is hosted by a web host that uses Nginx (such as Hypernode), then you will not use a .htaccess file and you can ignore this solution.
Plugins that are corrupt or incompatible
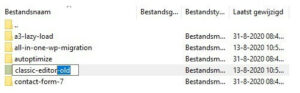
If all the above steps did not work for you, then it is advisable to look at the plugins/extensions you have installed. The easiest way is to deactivate all plugins at once. You do this by renaming the folder containing your plugins to something else via Filezilla. For example: deactivated plugins. This ensures that all plugins are disabled and you can view your website again. Has the 403 message been resolved? Then one of the plugins is the culprit. Now you can rename the folder to the name it should have and you will disable the plugins one by one. You can also do this again by changing the name of the plugin, for example by adding -old after it.
This is how you go through all the plugins, until your website works properly again and you have disabled one plugin. That is probably the culprit.
403 forbidden Nginx
The Nginx 403 forbidden error message is one that we often encounter. In principle, this message does not differ from the standard 403 forbidden message, but it is now clear that this is a website that runs on Nginx. You would do well to at least check your Nginx configuration files for possible errors. By default, the Nginx configuration files are located in /etc/nginx. If you check this directory you will find some configuration files for the different modules of Nginx. The main configuration file is /etc/nginx/nginx.conf. This is the file containing all the important guidelines for NGINX, similar to Apache’s main file httpd.conf.
With Hypernode, the NGINX configuration files are located in /home//domains//var/etc. If you check this directory you will find some configuration files for the different modules of Nginx. All files located here and ending with the extension nginx.conf are from these configuration files. You will also see a sub folder scope-http, files in this folder are similar to Apache’s main file httpd.conf. Of course you can also enlist the help of your web host for this. Read more about customizing your Nginx configuration file for Magento in our FAQ.
Hi! My name is Dion, Account Manager at Hypernode
Want to know more about Hypernode's Managed E-commerce Hosting? Schedule your online meeting.
schedule one-on-one meeting +31 (0) 648362102