
Update Jan 3 2019: the Vagrant has since been deprecated, use hypernode-docker instead.
The world of software is full of things that take way too long. While computers are getting faster, there is an even larger increasing amount of tests to run, dependencies to install and slow sources to pull them from. Here at Byte we know all about dealing with such processes. This post is about how to speed up your Magento development cycle by automatically testing your commits using Jenkins and Vagrant and then deploying the new revision to Hypernode once everything is OK.
Installing Jenkins
The first step for setting up automatic testing is finding a way for tests to automatically run when a commit is made. There are many options to choose from. The most popular two by far are Travis-CI and Jenkins. Because Travis doesn’t support booting Vagrant boxes, we’ll go with Jenkins for this tutorial.
It would be best to have a dedicated Jenkins machine (or cluster even) but if you want you can also install it locally on your computer. The amount of concurrent jobs you can run depends on how much RAM you have.
Installing jenkins on Ubuntu:
wget -q -O - https://jenkins-ci.org/debian/jenkins-ci.org.key | sudo apt-key add -
sudo sh -c 'echo deb http://pkg.jenkins-ci.org/debian binary/ > /etc/apt/sources.list.d/jenkins.list'
sudo apt-get update
sudo apt-get install jenkins
Change the HTTP_PORT to something other than 8080 so it doesn’t clash with the Vagrant’s forwarded staging ports. If you use the LXC version of the box you don’t need to do this.
wget -q -O - https://jenkins-ci.org/debian/jenkins-ci.org.key | sudo apt-key add -
sudo sh -c 'echo deb http://pkg.jenkins-ci.org/debian binary/ > /etc/apt/sources.list.d/jenkins.list'
sudo apt-get update
sudo apt-get install jenkins
We also need to edit the sudoers file and add two lines so that Jenkins can use the vagrant-hostmanager plugin without asking for a password.
wget -q -O - https://jenkins-ci.org/debian/jenkins-ci.org.key | sudo apt-key add -
sudo sh -c 'echo deb http://pkg.jenkins-ci.org/debian binary/ > /etc/apt/sources.list.d/jenkins.list'
sudo apt-get update
sudo apt-get install jenkins
The deployment scripts
Next we need a repository to pull from in our Jenkins job. That repository should contain two scripts. One to deploy the shop on the hypernode-vagrant test environment, and one to deploy it on the production environment.
In this tutorial an example repository with an ansible playbook that installs the Magento default installation will be used, but for a real shop this could be a script that updates your shop to the latest revision or imports some things into the database (there are many different deployment strategies for Magento).
Installing the test dependencies
For this example, make sure you have the following installed to be able to run the deployment scripts:
- ansible
- python-nose (or install nose in a virtualenv)
- python-selenium (or install selenium in a virtualenv)
- PhantomJS
The deploy_test.sh script
To thoroughly test if the deployment works, we need to apply the script on both on an empty Hypernode and an already provisioned Hypernode. This ensures that the deployment is idempotent. Idempotency is a very nice attribute to have in a deployment script because it eliminates state, meaning you will presumably get the same result every time even if there have been previous changes to the target.
In this example we’ll use this script.
It basically does three things:
- Starts a new hypernode-vagrant box
- Runs the deployment
- Runs the tests
- Runs the deployment (again)
- Runs the tests (again)
The deploy_production.sh script
We also need a deploy to production script. This script is similar to the script that deploys to the test environment, the difference is that instead of using the test fixture, it uses production settings.
The deployment script:
- Runs the deployment
- Runs the tests
The test script
For this example a simple test-case that asserts whether the string ‘Magento’ is in the site’s source is used. Frontend testing with tools like Selenium and PhantomJS can reveal many serious mistakes and save you a lot of time. Ideally you should write a test for every piece of functionality you add.
Example test from the testcase.py file:
wget -q -O - https://jenkins-ci.org/debian/jenkins-ci.org.key | sudo apt-key add -
sudo sh -c 'echo deb http://pkg.jenkins-ci.org/debian binary/ > /etc/apt/sources.list.d/jenkins.list'
sudo apt-get update
sudo apt-get install jenkins
Creating the Jenkins jobs
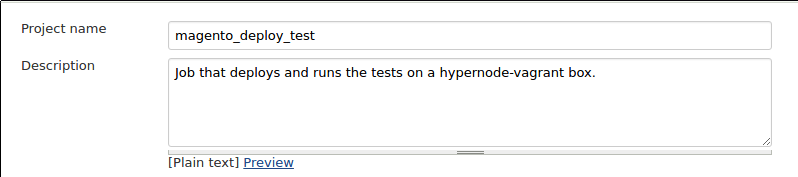
Next up is creating the jobs in Jenkins. Creating jobs is very simple. Click New Item and select Freestyle project and give the job a nice name. On the configuration page for the job there are many settings to configure.
If you want to build your shop automatically from git, also install the git plugin from the Manage Jenkins -> Manage Plugins menu.
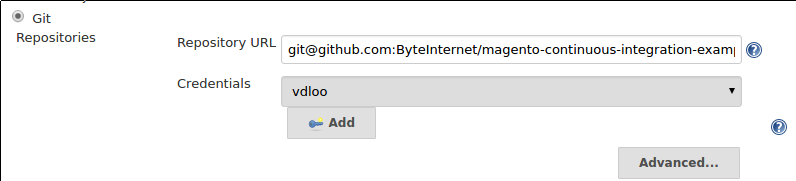
Select Git from Source Code Management, add your credentials if necessary and enter the repository URL. In this example that would be https://github.com/ByteInternet/magento-continuous-integration-example.git
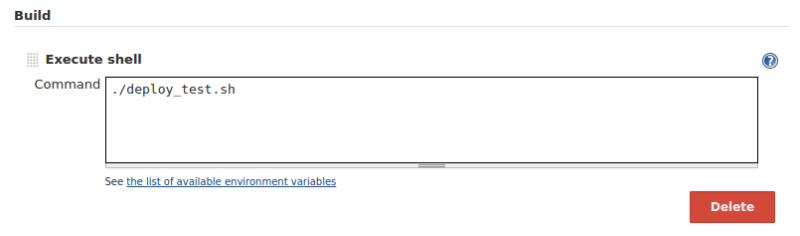
Click add build step and select execute shell. Enter “./deploy_test.sh” and press save.
You can now press Build Now on the job page to trigger the build.
For the production job, click New Item again but this time instead of selecting Freestyle project select Copy existing Item and enter the name of the deploy test job.
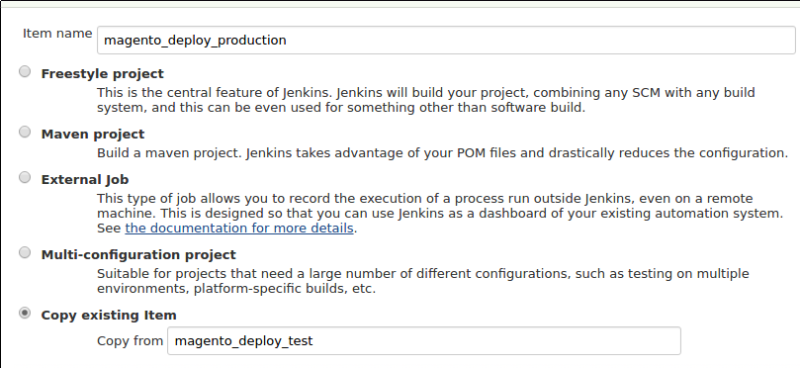
On the configure page change ./deploy_test.sh to ./deploy_production.sh.
The pipeline
Lastly we could connect the deploy test job to the deploy production job. When the tests pass, things could in theory be automatically deployed.
In the configure menu for the test job we can add a post-build action. By selecting Build other projects we can start the deploy job when the test job succeeded.

Automatic builds
Lastly you can configure the jobs to automatically build when changes are made to the repository, like when you push a new branch or a commit. Taking it one step further, with Github integration you can even build pull requests (and automatically close them if the build fails!) Setting that up falls beyond the scope of this blog, but take a look at this post for a step by step guide.
[widget id=”magereport_widget-5″ /]
Hi! Mijn naam is Dion, Account Manager at Hypernode
Wil je meer weten over Hypernode's Managed E-commerce Hosting? Plan je online meeting.
plan een een-op-een meeting tel:+31648362102